A little experiment from early 2019 — the aim was to modify existing camera tech to construct a super nimble and versatile timelapse machine.
 The (slightly nauseating) results
Definitions first – a hyperlapse is fundamentally just a moving timelapse, (and a timelapse is just a sped up video) — generally speaking the movement has to be a considerably large amount. You can shoot a timelapse on a motorised slider, where it might move a metre or so over the course of the shot, but this wouldn’t be considered a hyperlpase per se. We’re talking zooming down a street or orbiting around a building here.
I’ve been into hyperlapses for a couple of years now, I just think they are a great way to add production value to any film or video project, and so much more engaging than a static timelapse would be. Here’s an example of some hyperlapse overdose from a Kickstarter video I produced for Nordgreen — a Scandinavian watch brand, in 2017.
A year or two ago I was getting asked to do them for all sorts of brands, I did some for the official Canon instagram account and I even made a hyperlapse showreel – I was becoming quite the hyperlapse guy.
There was trouble in paradise — hyperlapses are hit and miss, they don’t always come out great and they are also really dull and laborious to shoot — for reasons I’m about to explain. As an engineer and undercover nerd it got me thinking that there had to be a better way of doing it, so this is where the robotic hyperlapse journey begins…
Let’s run through the basics first:
How do you shoot a hyperlapse?
The method for creating these shots is very simple, you take a photo, move the camera a specific amount and repeat. Then the images are stitched together into a video file and digitally stabilised. This process requires the photographer to pace the entire route whilst lining up each shot independently. The photographer will normally aim at a specific point of interest (POI) and trace a path — keeping this point right in the centre of the shot as they come up to it or orbit around it. I find the best shots are when you have a lovely smooth pavement to walk along and when you can measure the distance between shots using the paving slabs as a guide.
If it’s dark you may want to use a tripod to get a longer exposure, this has the advantage of blurring out people and cars into pleasing smudges, but it takes a lot longer to line up individual shots as you will have to adjust the head each time. Also, you want the time interval between shots to be pretty consistent, so things moving throughout the whole of your final shot are smooth and not jumpy. For example, if you take a shot every 10s then the clouds in the sky will smoothly glide past, but if the interval varies, say: 5s, 15s, 10s, — they will jump and stutter.
I find the easiest way to do it is handheld, some people like to use a monopod, but if I stand up straight each time then I am always the same height, and if I line up the POI dead centre in my viewfinder, then the only thing I have to adjust in post is rotation. It’s quick and dirty, but it works and 90% of the shots in the above reel were shot like this.
Instability and wobbles occur when the POI is obscured (by busses, lamp-posts, etc.) even if only for one or two frames. You might start a hyperlapse shot and a bus comes and parks right in you way mid-way through, or 10 minutes in you get lazy and your photos are a bit off. I’d say 75% of my hyperlapse attempts end up in the bin as I can’t get them as stable as I would like, and i’ve built up quite a few tips and tricks over the years on how best to stabilise these shots (which I could definitely do an article on at some point too).
Here’s what a hyperlapse shot looks like pre and post stabilisation, you can see it doesn’t have to be perfect to get a decent result, as long as the POI remains central then it will work out ok:
The key challenge here is moving a camera along a specified path at a specified rate whilst ensuring maximum stability. For a high budget production automated solutions exist: rails, motion control dollies and cable cams are all possible methods for creating this effect and are used frequently in things produced by BBC Earth — but they are bulky, expensive, slow and difficult to set up. For the small scale production, no method is currently better than the simple person with a tripod technique.
What does the solution look like?
Funnily enough, a robotic hyperlapse machine already exists, it’s called a drone. Using an app like Litchi or just the hyperlapse mode on the Mavic 2, the user can input GPS coordinates for a specified path, input a speed and away you go. You can even repeat the same move at different times of day for a really cool day -> night effect.

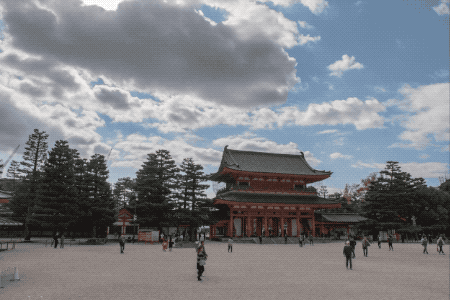
I had some fun with drone hyperlapses in St. Lucia using the Litchi app (before DJI made it a standard feature on the Mavic 2) it’s old news now and you see drone hyperlapses all the time in travel vlogs and destination films.
However, you can’t fly a drone everywhere, they blow around far too much at ground level to make this work well for a really precise movement, and battery life is only half an hour tops. You’re also relying on GPS here, which is only accurate to 5m or so and non-existent inside. I wanted a solution that you could control in the same way, but took a DSLR payload and drove it along the ground at a specific path at a specified speed — that would also be repeatable and accurate to +/-10cm.
Introducing — Motion Impossible
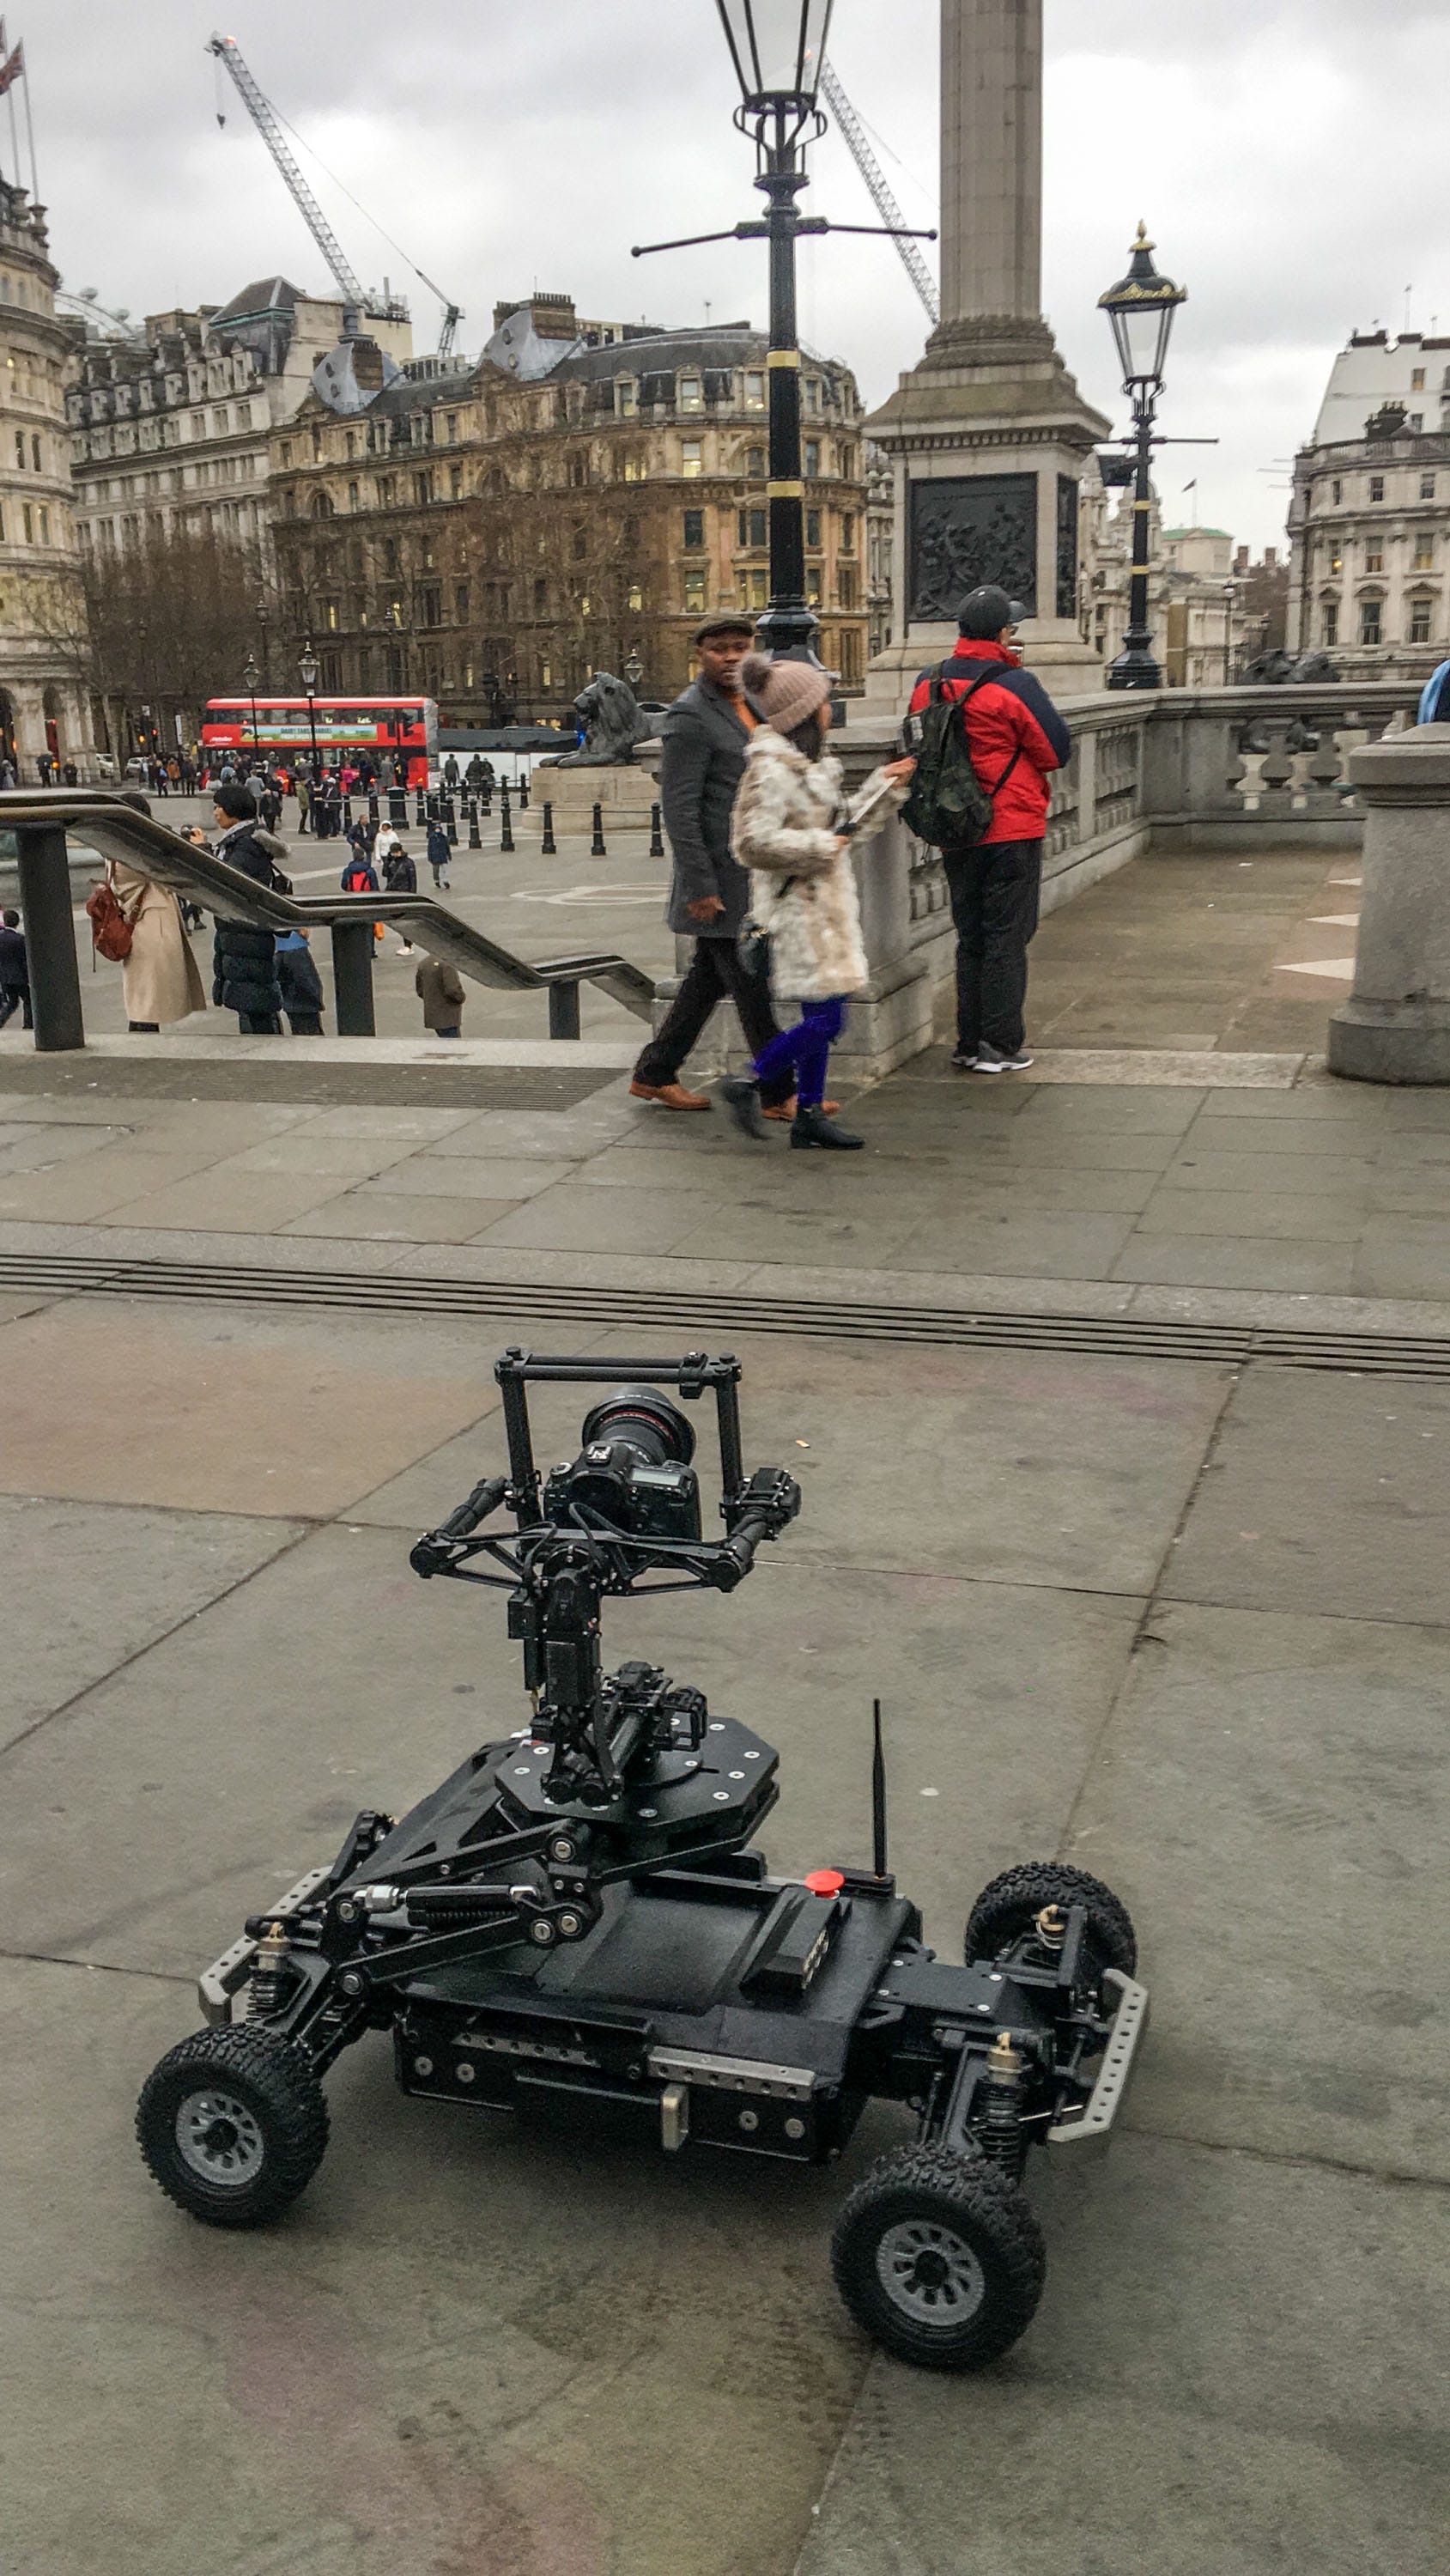
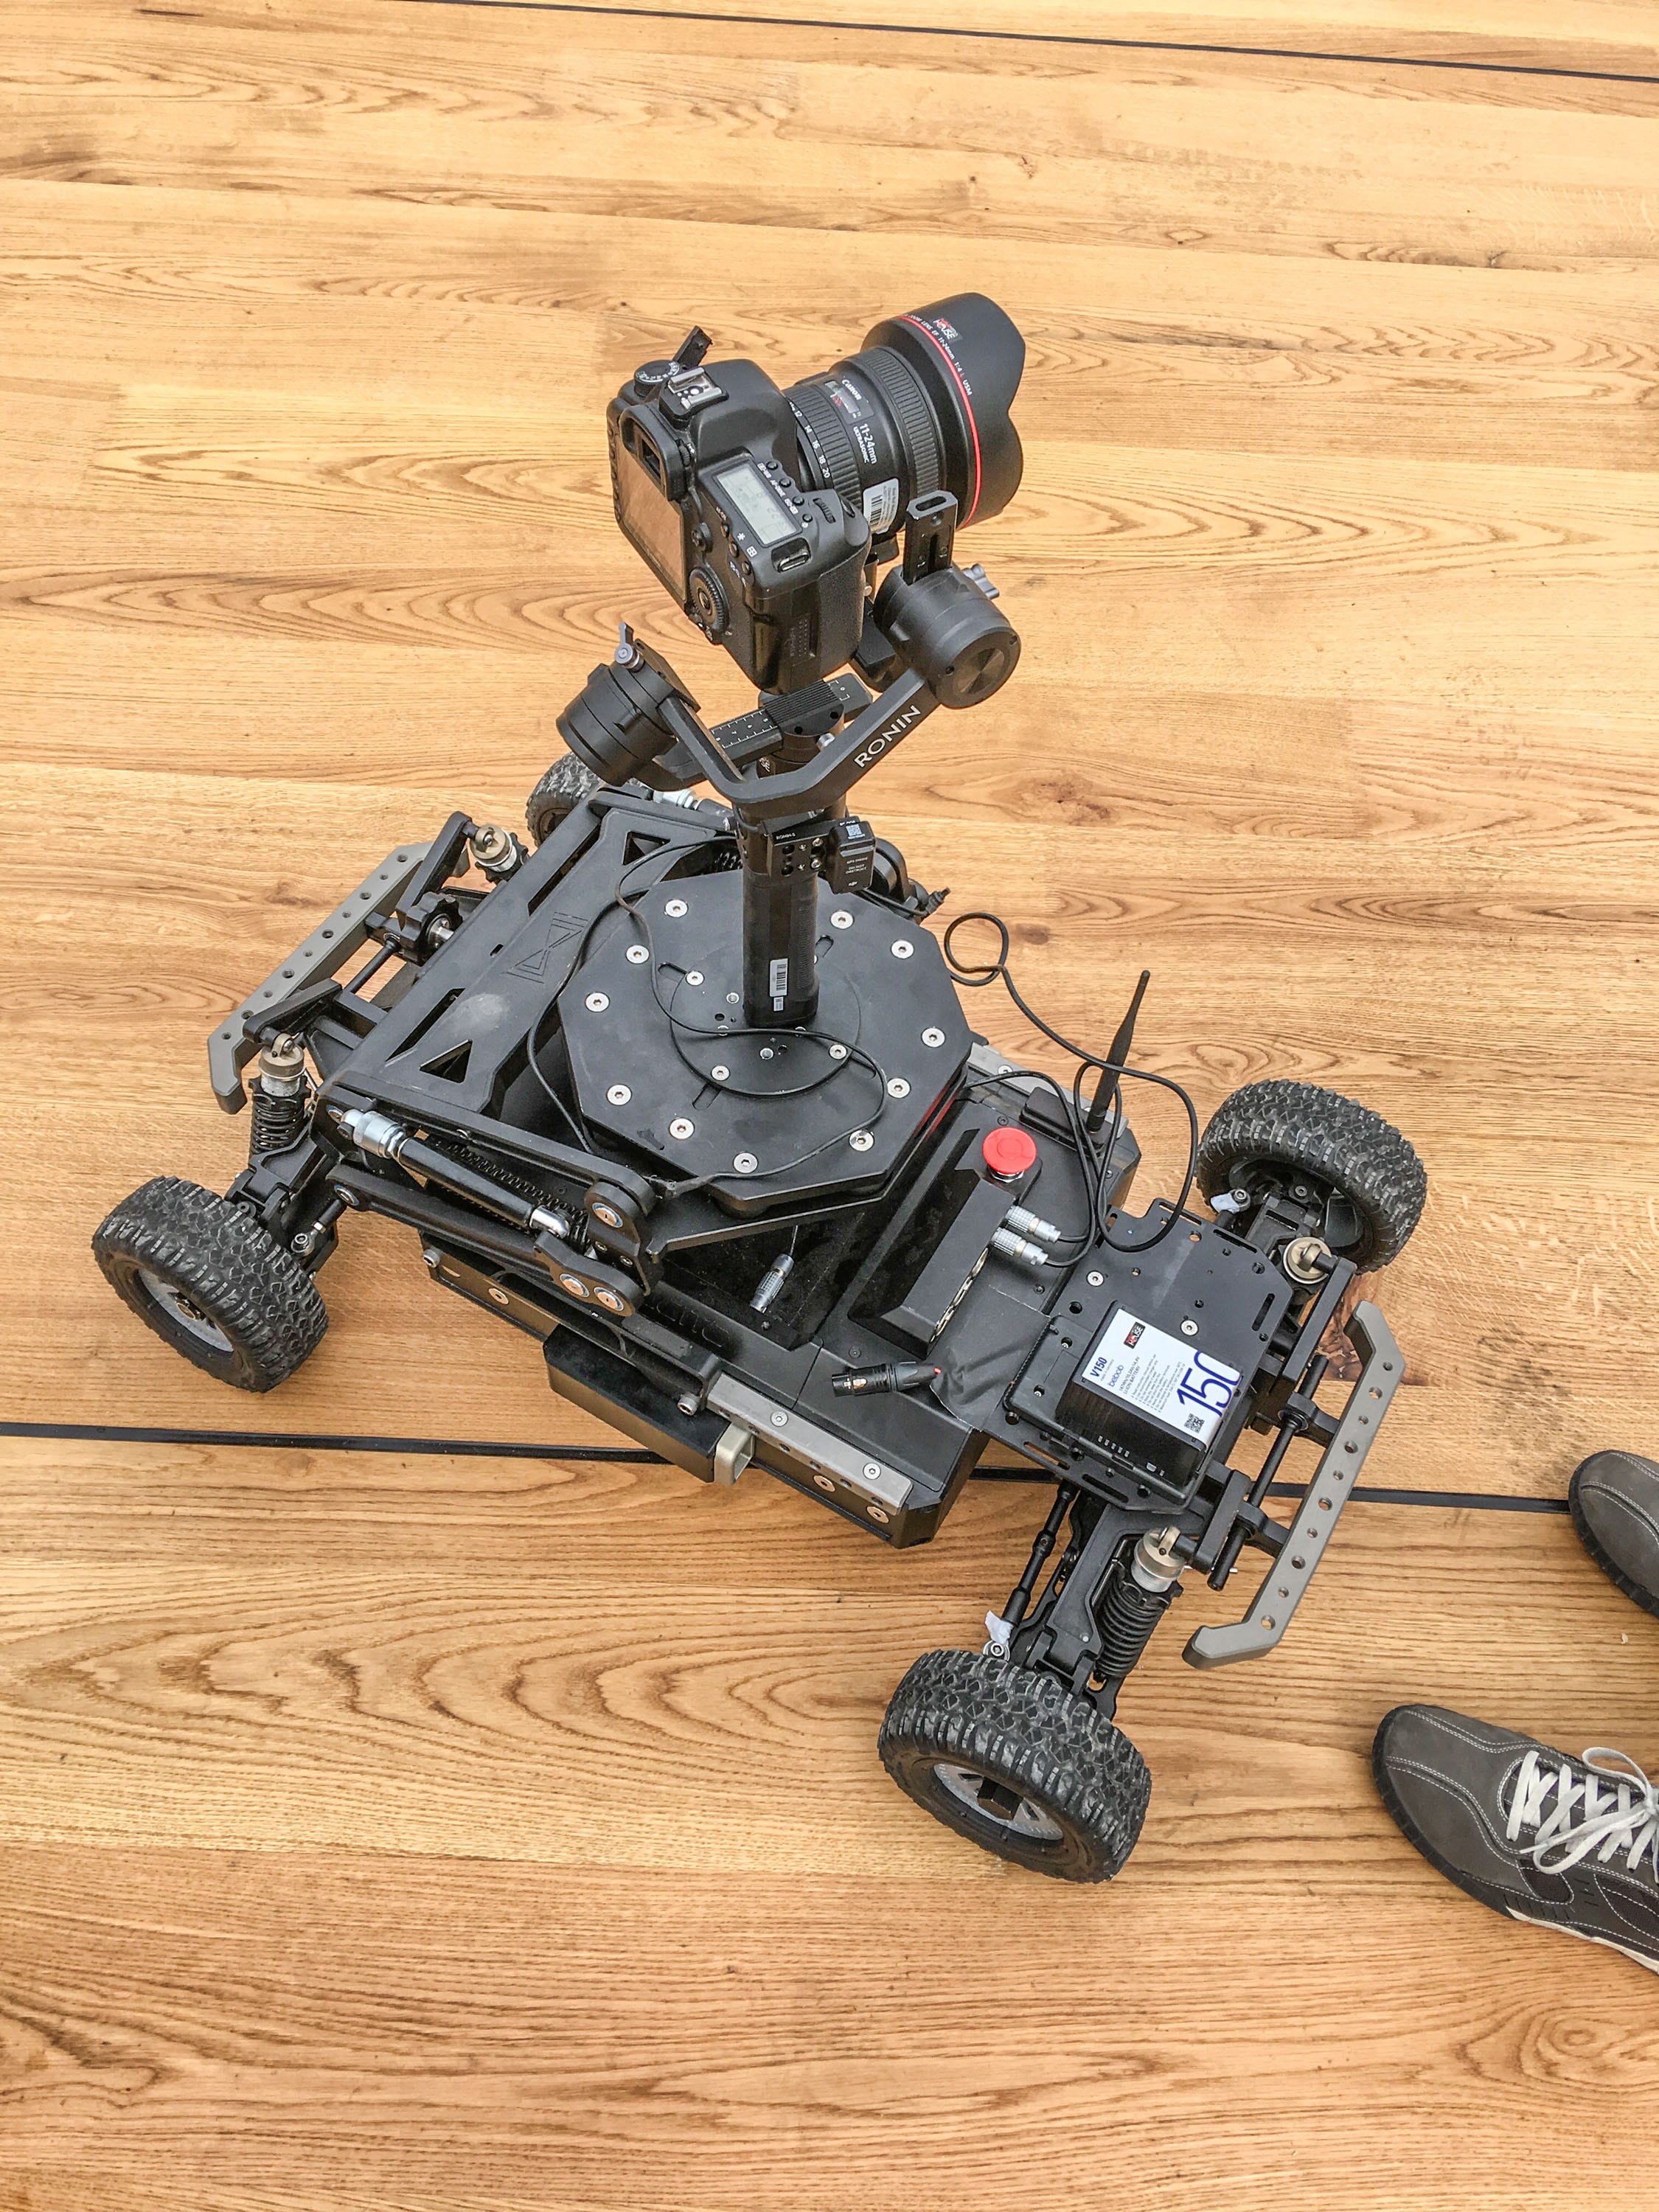
I quickly realised this would be made up of 2 main things, a gimbal to stabilise the camera and a buggy. Both in existence already on the market. I reached out to the Bristol based company Motion Impossible and they agreed to let me play with their Agito, which is actually designed to carry a much heavier cinema camera payload, and normally for high speed operation rather than very slow. But they we keen to give it a go to see what we could create.
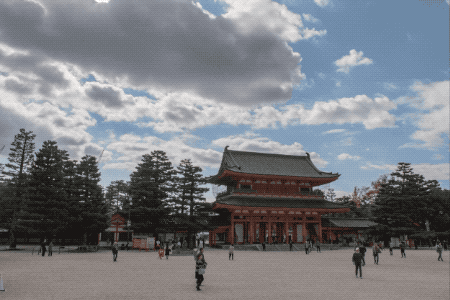
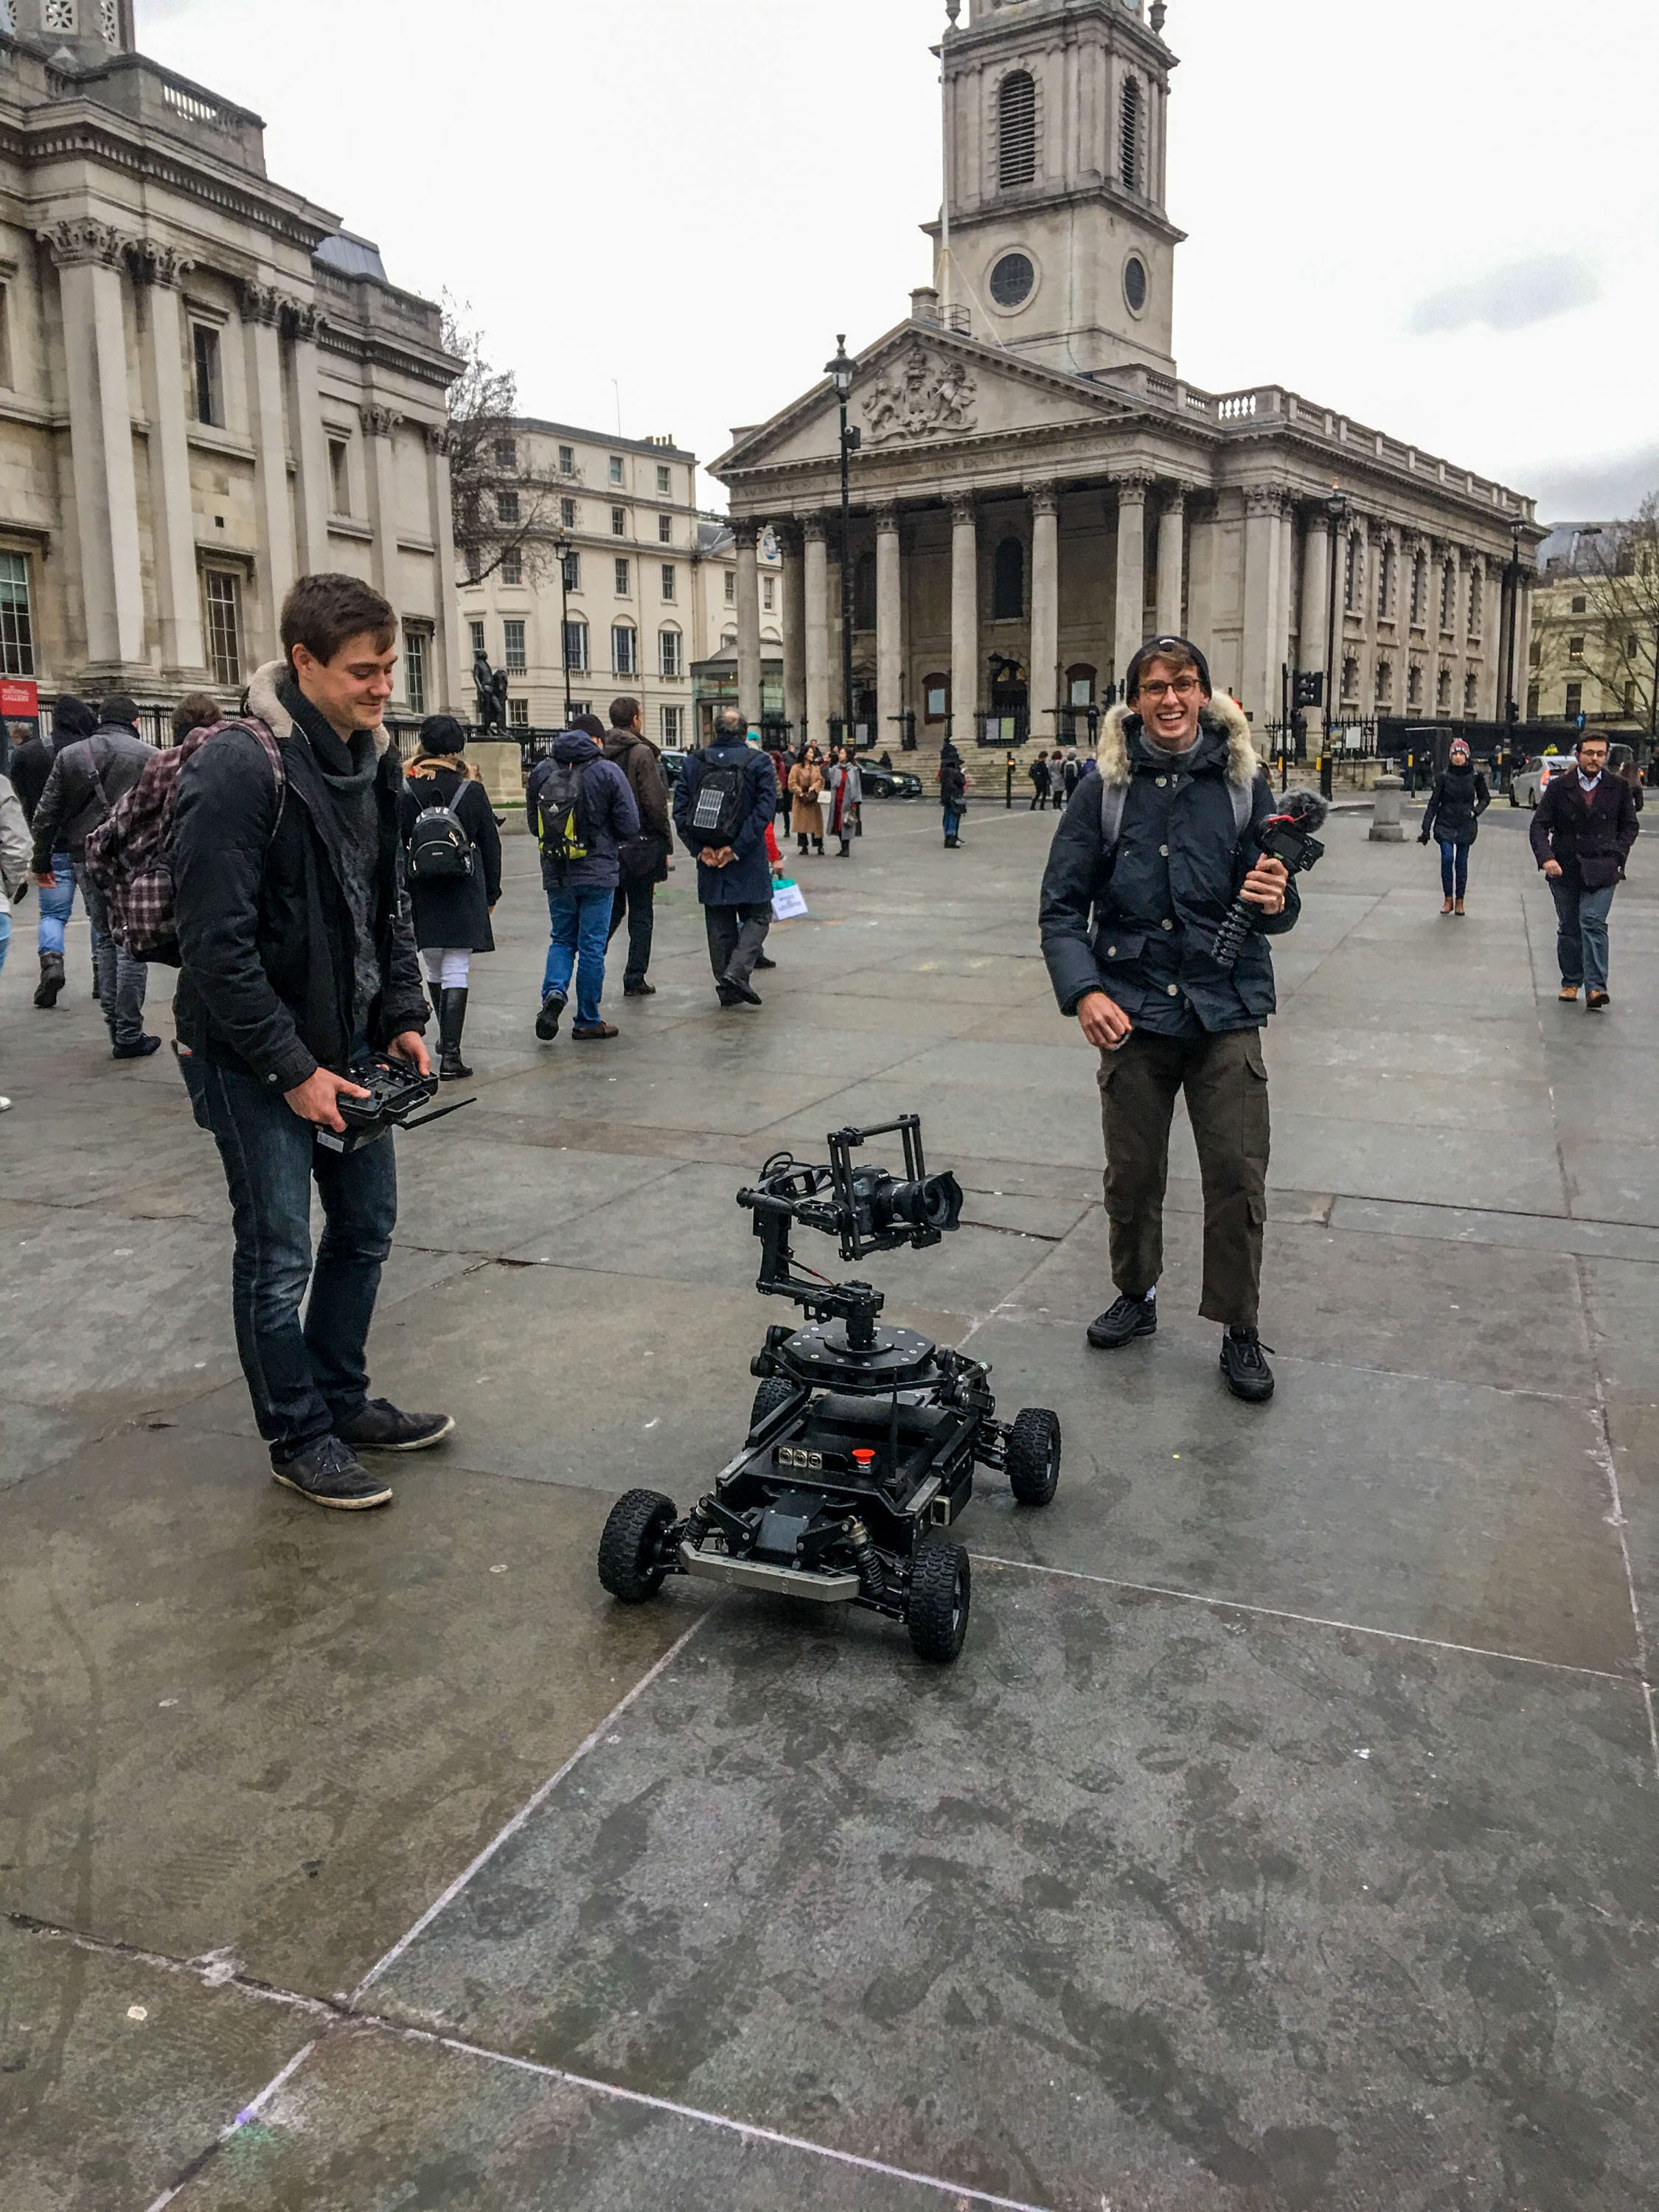
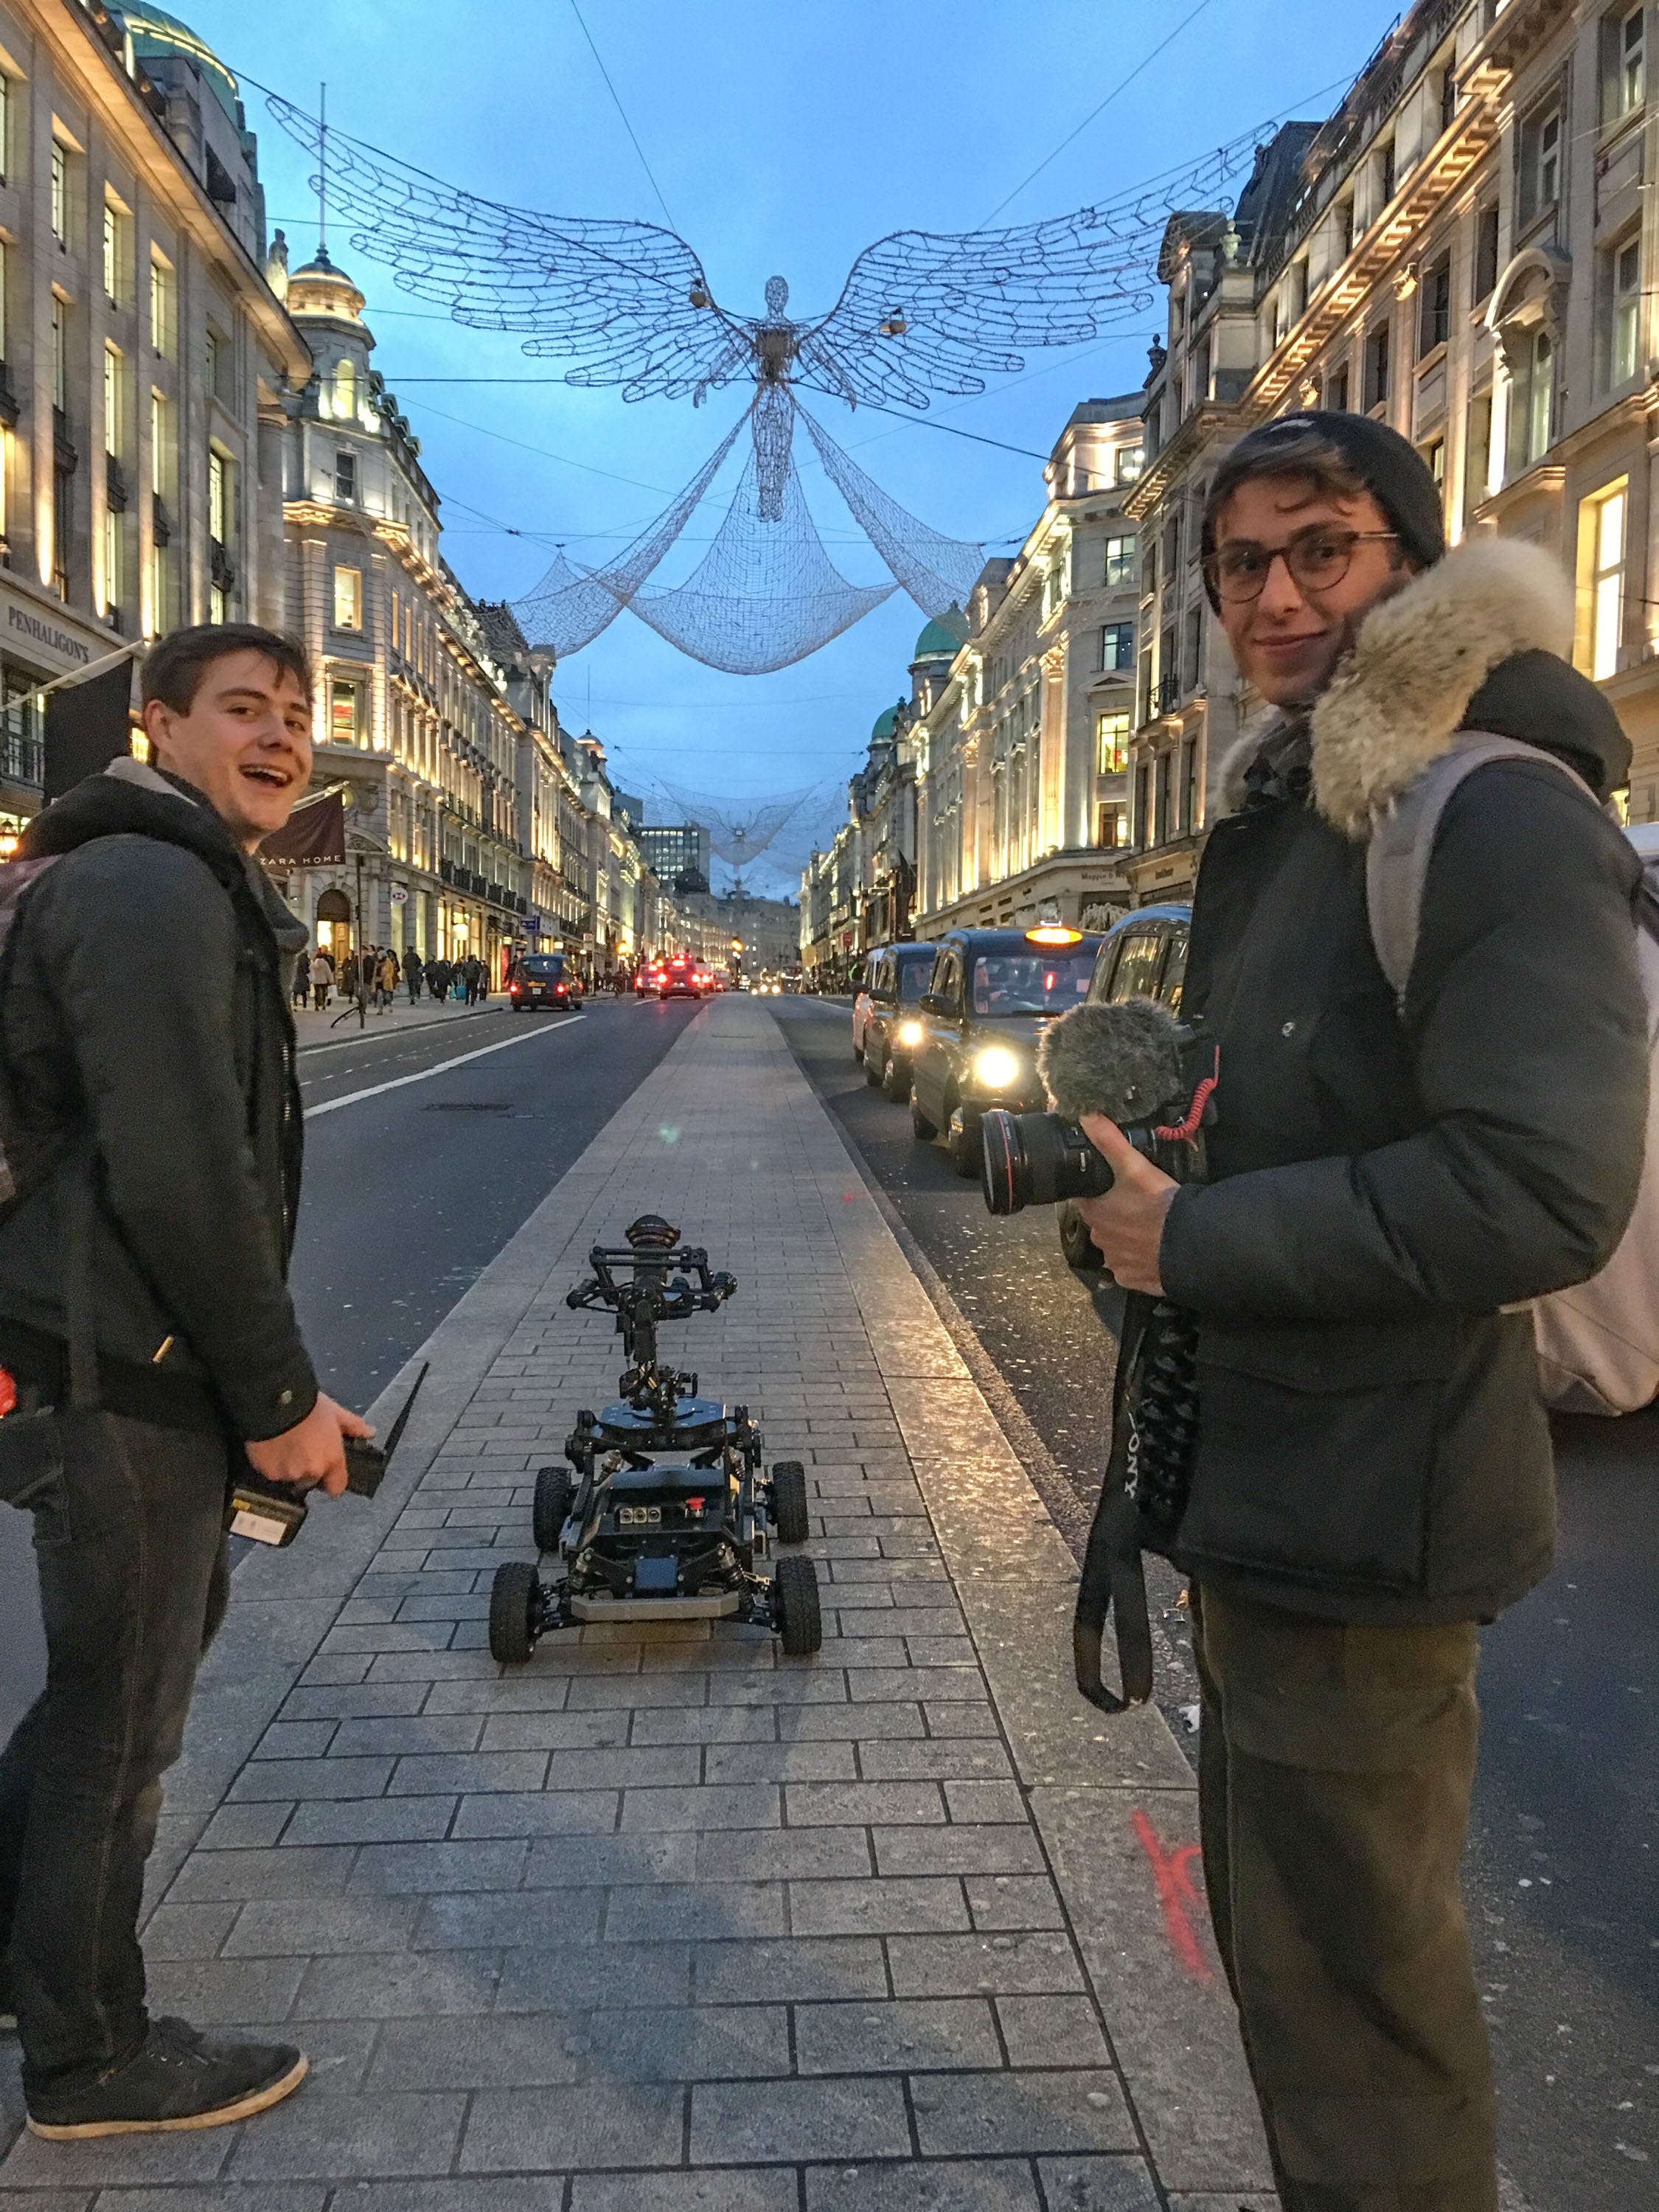
We took it for a spin around London and these were the results:
As a head, we used a Movi M15 gimbal — driving the Agito was all done manually, we set it to the minimum speed and tried our absolute best to follow a straight path or a line on the road. We did some ad hoc calculations as to how long our shot was going to take and where we wanted the camera to face, and used this to program the timelpase mode on the M15. The Agito didn’t have a stop-start functionality so it was continuously crawling along during the shots, which wasn’t ideal for longer exposures, but we didn’t have much choice. To actually shoot the lapses we used my trusty 5D and the intervalometer provided by the Magic Lantern hack. Once our shot was planned we did all the calculations, hit start on each of the three parts and hoped for the best.
Here are some photos from the day:
And a dump of BTS clips from my phone:
There were a couple of really nice shots, and a whole heap of rubbish ones — but definitely enough success to prove this as a viable option for shooting hyperlapses going forward. It was clear that the buggy and gimbal provided easily enough stability for the job (on a relatively smooth pavement), we just needed to work out how we could drive the thing exactly where we wanted it to go, and how to streamline the gimbal and buggy to work together.
When shooting a hyperlapse by hand, if you have to dodge something on the road or your path isn’t exactly straight, you will instinctively correct it when you take your shot – to keep fixed on the POI. The gimbal however, doesn’t know what it should be looking at — it just tries to keep the camera looking the way you asked it too, without making the small corrections required to lock onto a target. We found that small deviations from the buggy would lead to quite a large stray in the results.
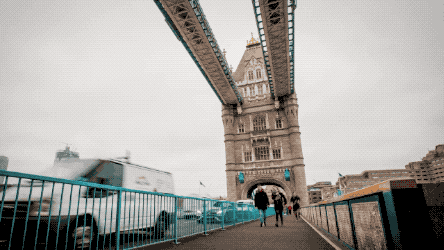
Additionally, the gimbal has a certain deadband (and level of precision) where it doesn’t necessarily notice (or isn’t able to respond) to an adjustment below a certain threshold. With a tighter lens ( >35mm) this is even more noticeable, so our best results were shot at 16mm on my faithful Canon 16–35mm f2.8. Interestingly, the most successful shots where when we weren’t trying to focus on a POI or look directly ahead, they were the shots where we wanted a wider more sweeping movement from the gimbal, such as the epic ‘hypermerang’ from Tower Bridge, shown here. This was because the overall movement of the gimbal (150 degrees or so) was large enough that the angle discrepancy and stray between shots was comparatively small, and therefore irrelevant. We also got the timing spot on with this shot, the buggy took exactly the same amount of time to make the journey over the bridge as the camera did to make the rotation. Which was down to little more than a kindly nugget of good luck – as we had no accurate speed control on the Agito at all at this stage.
For me, this shot illustrates exactly why this setup is so cool, it would be totally impossible to shoot a hyperlapse like this by hand, you don’t have a fixed POI, so you wouldn’t know where to point the camera! The only other solution would be a dolly track and a sophisticated motion control system, but the movement was about 100m along a narrow footpath — which wold be a challenge even if you did have the budget to consider that as an option. Doing it like this, we were able to surreptitiously drive the Agito across in about 10 minutes, whilst no one even batted an eyelid.
Introducing — Red Bull
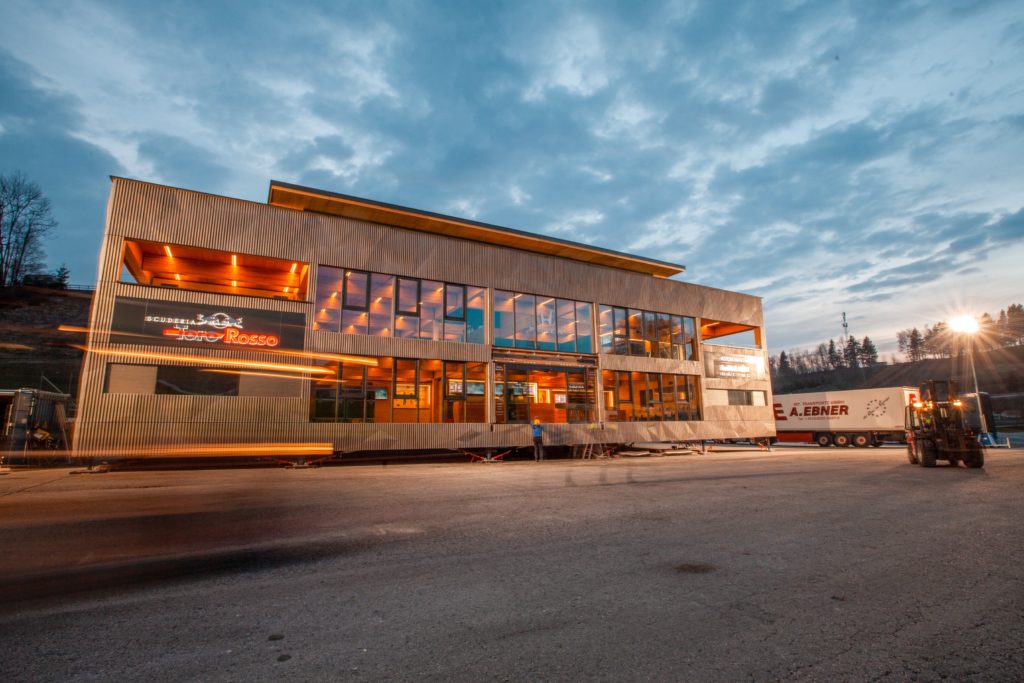
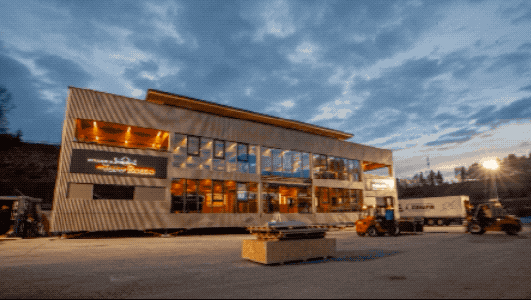
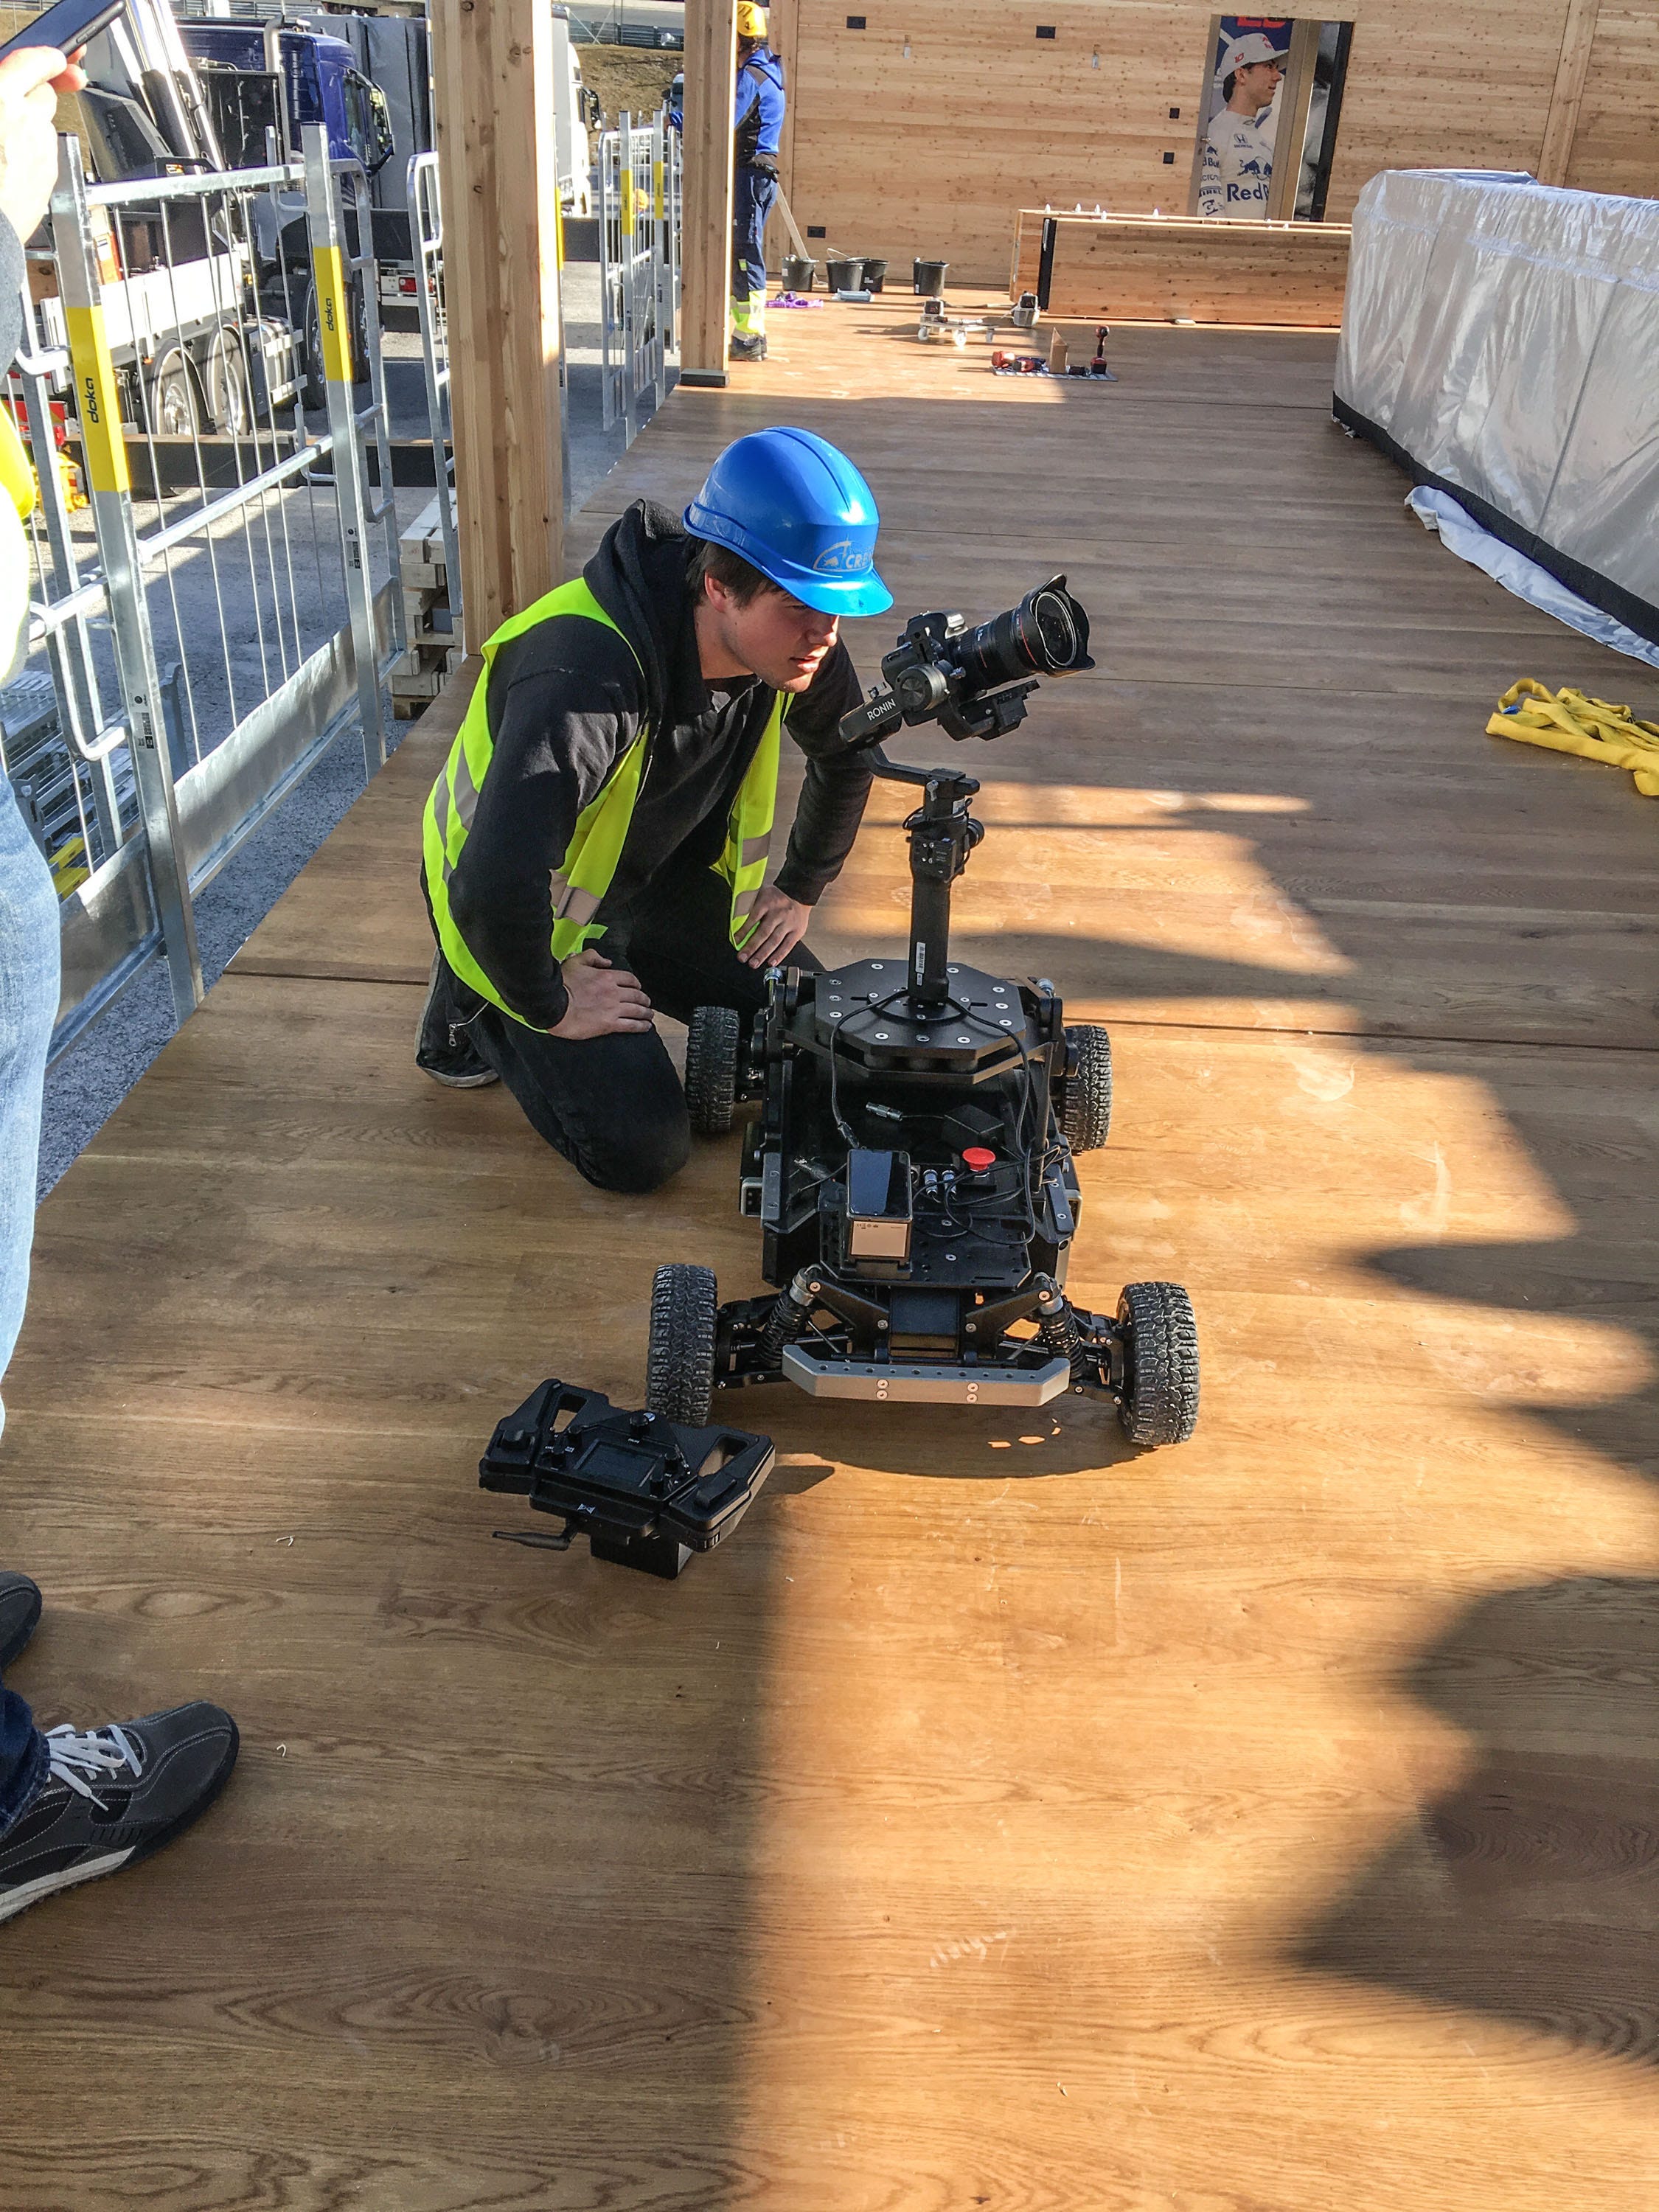
I was keen to push this further, so I passed the above video around some of my contacts to see if anyone had a real world project where they might be interested in bringing us along for some more testing. A few emails later and we were on a plane to Salzburg, to the HQ of Red Bull Media House. Our task was to timelapse the first proper construction of Red Bull Racing’s new ‘Energy Station’ — a monumental temporary office that would be shipped across Europe and assembled in a flash on site at every European F1 race of the 2019 season. In the spirit of Red Bull, whilst most teams would settle for a portacabin, the energy station came in on 35 articulated lorries and with a team of over 100 workers, whose job was to snap all the pieces together in less than 72h, before stripping it down again 2 days later and posting it off to the next race…
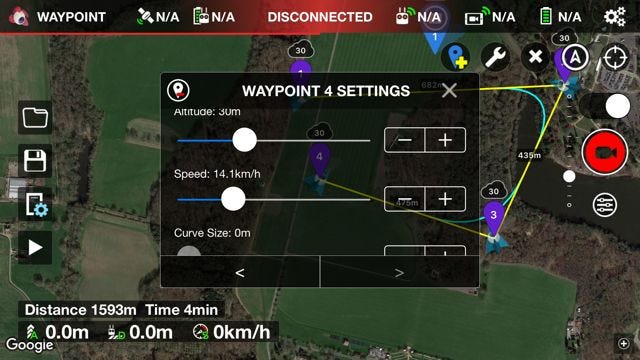
We had a few days to try and catch the best of the action with our Agito setup, to make a little hyperlapse film for Instagram. Since the London test, the Motion Impossible guys added a hyperlapse mode to the controls, giving us the ability to stop, shoot & move rater than continuously crawl and built in a more accurate speedometer too. We also used a Ronin S gimbal this time instead of the Movi, we thought because it was newer it might be a little more accurate.
Here are some snaps:

And some more BTS:
The Results
Here’s what went into the Red Bull Racing instagram clip, and here is my little edit of the best shots:
Much like the London shoot, there are some lovely moments but a lot of shots also had to be binned, drift and stray were real issues still, as we didn’t have any sophisticated control governing both gimbal and buggy together, i’d say 60% of shots were just not stable enough to be usable. Additionally, as we were working with a highly stressed construction crew who had much more pressing concerns than lining up the best shot for us — we had the added difficulty of setting up a shot, expecting a beam or staircase to be manoeuvred in, but then missing the action or facing the wrong way at the critical moment because we had no idea how long it was going to take.
It was clear this wasn’t perfect yet, but we were able to get in there and capture some really unique shots from right inside the construction itself, in a way that was adaptable and quick —I can’t think of any other way of capturing similar shots, and being as non-disruptive as we were to the construction crew.
Evaluation
As a proof of concept, this was a fun experiment — to make a reliable and commercially useful tool however, it’s clear to me we’d need quite a lot of modification.
Firstly we’d need to come up with a robotic guidance system and obstacle avoidance, GPS seems like a good option but the accuracy is still +/- 5m, and non-functional inside buildings, so definitely not the optimal solution. Alternatively, we could use lasers or triangulation from temporary beacons that we put up nearby for every shot. Something I also think would be interesting to explore is the UWB location technology found in the latest iPhones, claiming accuracy to +/- 30cm which I suspect is around the precision we require.
Next we’d also want to make sure the gimbal head and dolly are communicating with each other directly. We found the most successful shots were ones where the gimbal movement was large, because on the subtle ones or shots where we wanted a fixed camera angle there was just too much stray. We’d want to experiment with different types of motor (servo, stepper) to work out which one really does the best job of locking the camera onto the target. The requirements here aren’t for continuous stabilisation – like an ordinary brushless gimbal would be, it’s about the consistency between shots.
Finally, a glossy UI / app to tie it all together; much like the Litchi app, it would be awesome to input your waypoints, your POI and your overall time — then just hit go. Storing the routes for future repetitions would also be a fantastic feature.
In summary
If you’ve read this and you’re now thinking, right, so all you did is put an off-the-shelf-gimbal on an expensive buggy and drive it around, you’d be 100% correct… but it was an MVP, and it’s also the first time anyone has ever shot hyperlapses like this — to my, Motion Impossible and Red Bull’s knowledge at least.
I hope I get the chance to amend this article outlining how we went away and added sophisticated control systems to the buggy, made it interface with the gimbal, and built a sleek app to control it all. There’s definitely a market out there for people like me who love hyperlapses and creative technology, and booming market of small independent production companies across the globe who would undoubtedly lap it up too.
If this has interested you then leave a comment and let’s talk about how we can take it further. ✌🏻